Desserts
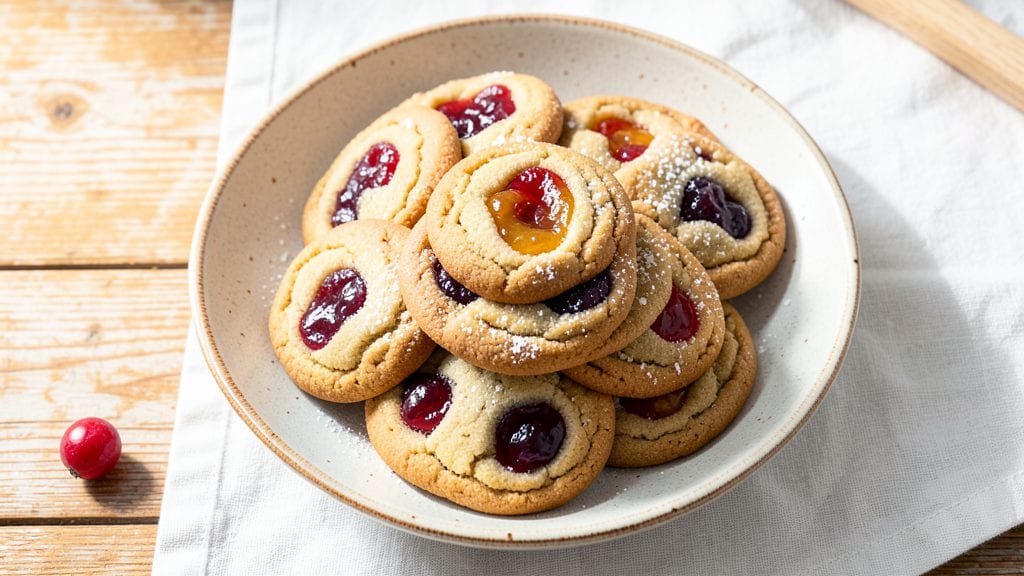
This old-fashioned jam jam cookies recipe brings back the magic of childhood dessert tables with its signature double-jam surprise. The secret lies in two layers of jam—one in the dough, another in the filling—creating that iconic burst of fruity goodness with every bite.
After perfecting this recipe through years of baking, I’ve refined it to deliver crisp edges, tender centers, and that nostalgic jam flavor in every mouthful.
The beauty of these cookies is their simplicity: just a few pantry staples and a little patience for the dough to rest. The key technique is rolling the dough thin enough to accommodate the jam filling without cracking, while still maintaining that classic chewy texture.
I’ve tested this recipe countless times, and the results are always the same—cookies that taste like a homemade treat from your grandmother’s kitchen.
What makes these cookies truly special is that double-jam burst—the first layer of jam in the dough adds subtle sweetness, while the second layer in the center delivers that explosive burst of flavor.
The aroma of vanilla and jam filling the kitchen as they bake is enough to make anyone rush to the oven. These cookies are perfect for pairing with a warm cup of tea or coffee, making them an ideal treat for any occasion.
Whether you’re baking for a family gathering or simply craving a taste of nostalgia, these jam jam cookies are sure to impress. The recipe is foolproof, and the results are consistently delicious—no matter how many times you make them. Let’s get baking!
Ingredients for old fashioned jam jam cookies
Pantry staples plus two kinds of jam—this is the nostalgic lineup for jam jam cookies.
| Ingredient | Amount | Notes |
|---|---|---|
| All-Purpose Flour 🌾 | 3 cups | Sifted for light texture |
| Unsalted Butter 🧈 | 1 cup | Cold, cubed, full-fat preferred |
| Granulated Sugar 🍚 | 1 cup | White sugar for classic sweetness |
| Light Brown Sugar 🍚 | ½ cup | Packed for chewiness |
| Large Eggs 🥚 | 2 whole | Room temperature for mixing |
| Vanilla Extract 🍯 | 1 tbsp | Pure vanilla for aroma |
| Baking Soda 🧂 | 1 tsp | For leavening |
| Salt 🧂 | ½ tsp | Fine sea salt preferred |
| Raspberry Jam 🍓 | 1 cup | Seeded, not chunky |
| Strawberry Jam 🍓 | 1 cup | For filling, any fruit jam |
| Powdered Sugar 🍚 | ½ cup | For dusting finished cookies |
The jam choice matters. Smucker's or Welch's are solid for the dough, but homemade jam takes it to another level. For the filling, pick something smooth—seedless raspberry or strawberry work best. I always double-check the jam label for 'no added pectin' if I can find it, as it keeps the texture just right. The butter needs to be cold (pop it in the freezer for 15 minutes if your kitchen's warm), or you'll end up with flat cookies. Grab Land O'Lakes unsalted butter if you want to be safe—it's consistently good quality. And don't skip the vanilla! The cheap stuff won't give you that real aroma.
No raspberry jam? Apricot or blackberry work in a pinch, but expect a different flavor profile. Short on strawberry for filling? Peach jam at half the amount gives a similar sweetness. The dough jam can be swapped for any fruit preserve, but low-sugar varieties prevent overly sweet cookies. If you're feeling fancy, try a mix of two jams in the dough—like raspberry and blackberry—for extra complexity. And if you're making these for a crowd, buy two jars of jam—you'll use more than you think. The powdered sugar? Confectioners' sugar is the only way to go here—it dissolves perfectly for dusting.
These cookies keep for about 5 days in an airtight container, but honestly? They disappear faster than that. Store them in a single layer at first so they don't smash together, then stack once cooled. Freeze extras for up to 3 months—just wrap them individually in plastic wrap first. I like to portion the dough into two balls before baking so I can handle them easily. And if you're making these ahead for a party, bake them 2 days early—the flavor improves as they sit!
Why You'll Love This Recipe
- No Mixer Needed: I swear by this recipe because it only requires a bowl and a spoon—no stand mixer, no food processor, just good old-fashioned elbow grease (or a wooden spoon if you’re lazy like me). The butter and sugars get creamed together in minutes, and the jam just folds right in without overworking the dough.
- Buttery-Jam Magic: That perfect balance of rich brown sugar caramelizing with the jam? It’s like a hug in cookie form. The butter keeps them tender, while the jam’s tangy sweetness cuts through—no one ever leaves crumbs in the pan.
- Holiday or Snack Attack: These cookies freeze like champs, so I bake a batch in December and pull them out all year. They’re just as welcome on a coffee break as they are in a holiday gift basket—no one questions why you’re bringing cookies to a potluck.
- Pantry Staple Power: Between us, the ingredients cost less than takeout and use what you already have. Flour, sugar, butter—these are the basics that never let me down. Plus, the dough stays fresh for days, so I can make a double batch and still have backup for emergencies.
Instructions for old fashioned jam jam cookies
Here's how to make these nostalgic cookies with a jam-filled surprise in every bite.
Mix the Dry Ingredients Together
In a medium bowl, whisk together the 3 cups of all-purpose flour, 1 teaspoon of baking soda, and 0.5 teaspoon of salt. I like to use a wire whisk for this because it helps break up any flour lumps and aerates the mixture slightly. You want everything to be completely combined before moving on.
Set this bowl aside while you prepare the wet ingredients. The reason we mix the dry ingredients first is that it keeps everything organized and prevents overmixing later when we combine everything. You'll notice the mixture looks light and fluffy—this is exactly what we want for tender cookies.
Cream the Butter and Sugars
In a large mixing bowl, combine the 1 cup of unsalted butter, 1 cup of granulated sugar, and 0.5 cup of light brown sugar. Using a hand mixer or stand mixer with the paddle attachment, beat on medium speed for 2 to 3 minutes until the mixture becomes light and fluffy. You'll see it nearly double in size and turn pale.
This creaming process is crucial because it incorporates air into the butter and sugar mixture, which helps create that classic tender texture in old-fashioned cookies. If you're using cold butter, it might take a minute or two longer to fully cream, but don't rush it—you want to see ribbons form when you lift the beaters.
Add Eggs and Vanilla
Add the 2 whole large eggs, one at a time, mixing well after each addition. Then stir in the 1 tablespoon of vanilla extract. The mixture should look smooth and slightly thickened, almost like a soft dough. If it seems too stiff, don't worry—it will come together once we add the dry ingredients.
I always use room temperature eggs for this recipe because they mix more evenly with the butter. If your eggs are cold, the dough might turn out too stiff. Here's a quick trick: place the eggs in warm water for 5 minutes before using if they're straight from the fridge.
Combine Wet and Dry Ingredients
Gradually add the dry ingredients to the wet mixture, mixing on low speed just until combined. Be careful not to overmix—you're looking for a soft dough that comes together when pressed. If it's too crumbly, you can add 1 to 2 tablespoons of milk (though our ingredient list doesn't include it, we can use a small amount from the jams if needed).
Once the dough comes together, turn it out onto a lightly floured surface and divide it into two equal parts. This makes it easier to handle when we add the jam filling later. Wrap each half in plastic wrap and chill in the refrigerator for at least 30 minutes. Chilling helps prevent the cookies from spreading too much in the oven.
Roll, Fill, and Shape the Cookies
Preheat your oven to 375°F and line two baking sheets with parchment paper. On a lightly floured surface, roll one portion of the dough into a 12-inch circle about 1/4-inch thick. Using a 2-inch round cookie cutter or glass, cut out circles and place them on the prepared baking sheets, spacing them about 2 inches apart.
Take a small spoon and place about 1 teaspoon of raspberry jam in the center of each circle. Then, use the same cutter to cut out another circle of dough and place it on top of the jam, pressing gently to seal. Repeat with the remaining dough and strawberry jam. The key here is to keep the amount of jam consistent so each cookie has a balanced burst of flavor.
Bake to Golden Perfection
Bake the cookies for 10 to 12 minutes, or until the edges are golden brown and the centers look slightly underdone. The jam will ooze out a bit as they bake, which is exactly what we want. Rotate the baking sheets halfway through for even baking. Don't overbake—they'll continue cooking on the hot pan after you remove them.
Let the cookies cool on the baking sheets for 5 minutes, then transfer them to a wire rack to cool completely. Once cooled, dust the tops with the 0.5 cup of powdered sugar for that classic old-fashioned look. These cookies are best enjoyed fresh from the oven, but they'll keep in an airtight container for up to 5 days. The jam filling stays gooey and delicious when stored properly.
Pro Tips For Making Old Fashioned Jam Jam Cookies
- Chill the Dough First: I learned this the hard way—skipping the fridge time leads to cookies that spread like pancakes. Wrap the dough in plastic and let it rest for at least 30 minutes (or up to 24 hours if you're patient). The jam will behave better, and your cookies won’t turn into sad, flat discs.
- Use Cold Butter, Not Soft: I was skeptical until I tried it: pull the butter straight from the fridge and cut it into chunks before creaming. Soft butter = cookies that melt into a gooey mess. Cold butter creates pockets for that signature jam jam texture—no one wants a brick.
- Weigh Your Brown Sugar: Pack that brown sugar like you’re making a snowball. The difference between scooping and pressing is the chewiness of your cookies. Too loose? Your cookies will taste underdeveloped. Too packed? They’ll be dense. A quick tap on the counter evens it out.
- Bake in Batches, Not Crowds: Stuff the pan too full, and your cookies steam instead of crisp. Aim for 2-inch gaps between dough balls—they’ll spread, but not fight for space. I know, I know, but trust the process: underbaked cookies taste like dough, and no one wants that.
Flavor customization for these flavors
Classic Jam Pairings
Stick with the traditional raspberry and strawberry combo for that nostalgic flavor, but don’t be afraid to experiment! Apricot and peach create a warm, slightly tart contrast, while blackberry and blueberry add a deeper, jammy richness.
I’ve tested grape jam in the filling—it adds a surprising depth that pairs beautifully with the dough’s vanilla notes. 🍓
Sweet & Spicy Twist
For a grown-up version, add ½ teaspoon of cinnamon and ¼ teaspoon of cayenne pepper to the dough. Then, use spiced apple jam for the filling—it balances the heat with sweetness.
A pinch of ground ginger in the dough also enhances the jam’s warmth. Trust me, the contrast is next-level! 🌶️
Citrus Zing
Brighten up the cookies with orange marmalade in the dough and lemon curd for the filling. The citrus cuts through the richness, making each bite feel fresh. If you’re feeling adventurous, try blood orange jam—it’s tart, vibrant, and pairs perfectly with the buttery dough. 🍊
Boozy Upgrade
Infuse the dough with 1 teaspoon of bourbon or rum extract for a subtle depth. For the filling, use blackberry brandy jam or spiced cherry jam—the alcohol enhances the jam’s flavor while keeping the cookies tender. A splash of vanilla extract in the dough ties everything together beautifully. 🍷
Seasonal Swaps
Spring calls for strawberry-rhubarb jam, while summer begs for peach and mango. In fall, cranberry-orange adds a festive touch, and winter deserves spiced apple-cinnamon. Each seasonal jam brings a unique texture and flavor that keeps these cookies exciting year-round. 🍁
Nutty Crunch
For texture lovers, sprinkle chopped pecans or walnuts between the dough layers before baking. The nuts add a satisfying crunch that contrasts with the jam’s softness. Toast them lightly first for extra flavor—just 5 minutes in a dry pan until fragrant. 🌰
Nutrition facts
Frequently asked questions
Why do these cookies have two layers of jam?
The first layer of jam in the dough adds subtle sweetness throughout the cookie, while the second layer in the center creates that signature burst of flavor with every bite. This classic technique makes each cookie taste like a little surprise! The dough layer also helps keep the filling from leaking out during baking.
Can I use store-bought jam or do I need homemade?
Store-bought jam works perfectly—just choose seedless varieties for a smoother texture. Brands like Smucker's or Welch's are reliable choices. For the dough, any fruit jam works, but avoid chunky varieties. Homemade jam adds extra flavor, but it's not required for delicious results.
How do I prevent the cookies from spreading too much?
Chill the dough for at least 30 minutes before rolling and cutting. Use cold butter (pop it in the freezer for 15 minutes if needed) and keep your work surface chilled. Also, preheat your oven to 375°F and bake on the middle rack for even heat distribution.
Can I make these cookies ahead of time?
Yes! Bake them 2 days ahead and store in an airtight container at room temperature. The flavor actually improves as they sit. For long-term storage, freeze unbaked dough balls or fully baked cookies (individually wrapped) for up to 3 months. Thaw at room temperature before serving.
What's the best way to dust the cookies with powdered sugar?
Use a fine-mesh sieve or a small bowl with a spoon to dust the cooled cookies. Shake gently over the cookies and tap the bowl to release excess sugar. For a more dramatic look, dust while the cookies are still slightly warm—it'll stick better. If you don't have powdered sugar, a light sprinkle of coarse sugar works in a pinch.