Desserts
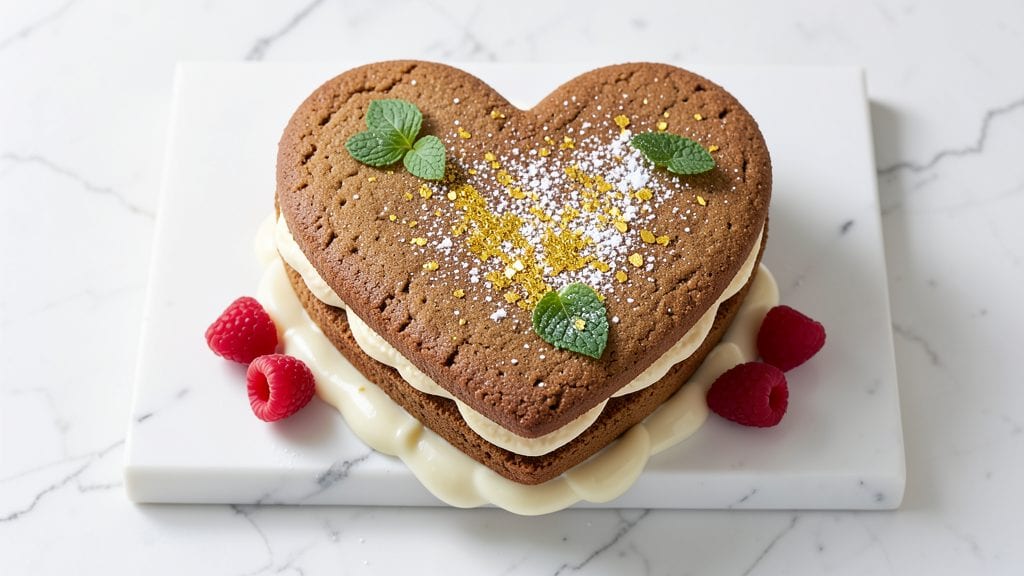
A heart-shaped cookie cake recipe transforms simple ingredients into a showstopping dessert that feels homemade yet impressive. The key lies in the sturdy cookie base—crispy edges that hold up to frosting without crumbling—paired with a foolproof assembly method that eliminates the usual mess.
I’ve perfected this technique over years of baking for holidays, and it always delivers a cake that looks like it came from a bakery.
The foundation starts with a precise cookie dough recipe that bakes into a sturdy, uniform base. You’ll use a heart-shaped cookie cutter to create the signature shape, then layer the cookies with a simple buttercream that stays stable under the weight of decorative elements.
The secret? Chilling the dough properly and baking in batches to ensure even cooking—no more uneven edges or soggy centers.
What you’ll end up with is a cookie cake that’s sturdy enough to hold intricate piping but delicate enough to crumble into perfect bites. The frosting stays smooth and creamy, not grainy, and the heart shape remains crisp and defined.
This is the kind of dessert that makes guests ask for the recipe, and it’s easier to make than you’d expect.
Perfect for Valentine’s Day, anniversaries, or just because—this cake requires no special equipment beyond a cookie cutter and a little patience. Let’s get started on creating something that looks as beautiful as it tastes.
Ingredients for heart shaped cookie cake
Simple yet impressive ingredients create a sturdy cookie cake base with creamy frosting.
| Ingredient | Amount | Notes |
|---|---|---|
| All-Purpose Flour 🌾 | 3 cups | Sifted for even texture |
| Unsalted Butter 🧈 | 1 cup | Cold, cubed for dough |
| Granulated Sugar 🍚 | ¾ cup | Superfine preferred for smoothness |
| Large Eggs 🥚 | 2 whole | Room temperature for blending |
| Vanilla Extract 🌿 | 1 tbsp | Pure extract for authentic flavor |
| Salt 🧂 | ½ tsp | Fine sea salt preferred |
| Baking Soda 🍞 | ¼ tsp | Ensures proper rise |
| Heavy Whipping Cream 🥛 | 1 cup | Cold for buttercream stability |
| Powdered Sugar 🍚 | 2 cups | Sifted for smooth frosting |
| Heart-Shaped Cookie Cutter ❤️ | 1 whole | Metal preferred for crisp edges |
| Parchment Paper 📄 | 1 sheet | For even baking surface |
| Food Coloring (Optional) 🎨 | ½ tsp | Gel for vibrant color |
| Decorative Sprinkles (Optional) 💎 | ¼ cup | For festive presentation |
The flour and butter form the sturdy foundation—King Arthur or Gold Medal flours yield the best texture. Cold butter is essential for crisp edges, so don’t let it soften. For the sugar, superfine dissolves more smoothly, but regular granulated works if pulsed in a food processor. The vanilla matters here: Nielsen-Massey or McCormick pure extract adds depth. If you’re baking for a special occasion, invest in a heart-shaped metal cutter—plastic ones distort during baking. Parchment paper prevents sticking, but a lightly greased baking sheet works too if you’re in a pinch.
No superfine sugar? Pulse regular granulated in a food processor for 2-3 minutes—it’ll be fine. Short on butter? Vegetable shortening works in a bind, but butter’s flavor can’t be beat. The frosting calls for heavy cream—whipped to soft peaks—but Cool Whip in a squeeze bottle saves time. For color, gel food coloring blends better than liquid. If you’re skipping sprinkles, try crushed candy canes or edible glitter for a festive touch. The baking soda is non-negotiable for proper rise—baking powder won’t substitute here.
Store unbaked dough in an airtight container for up to 48 hours—it actually improves as it rests. The buttercream keeps 3 days refrigerated, but add a splash of milk if it thickens. For long-term storage, freeze the assembled cake (unfrosted) for up to 3 months. Thaw at room temperature before adding frosting. To reheat slices, microwave for 10-15 seconds—just enough to soften the edges without melting the frosting.
Why You'll Love This Recipe
- No Mixer Needed: I swear by this—just cream the butter and sugar by hand (or use a fork, no judgment). The dough comes together faster than you can sing "Happy Birthday," and those heart shapes? A simple cookie cutter does the work.
- Buttery Vanilla Bliss: That rich, warm vanilla swirled into melted butter? It’s the kind of flavor that makes you pause mid-bite. The sugar caramelizes just enough to give it a subtle crunch while staying soft—like a hug in cake form.
- Date Night or Dessert Party: Between us, this is my go-to for Valentine’s Day or when I want something special without fuss. Frost it with cream cheese glaze, add sprinkles, or keep it simple—it’s always a crowd-pleaser, even if I’m the only one eating it.
- Leftovers? More Like Leftovers: Honestly, I rarely bake the whole batch because it disappears so fast. But if you do end up with extras? Toss them in the freezer and reheat for 10 seconds—still warm, still delicious, zero effort. Budget-friendly and foolproof.
Step-by-step instructions for heart-shaped cookie cake
Here's how to create a perfectly structured cookie cake with clean edges and flawless frosting.
Prepare the Cookie Cake Dough
In a large mixing bowl, combine the 3 cups all-purpose flour, 0.75 cup granulated sugar, 0.5 teaspoon salt, and 0.25 teaspoon baking soda. Whisk together until evenly distributed—this ensures no pockets of dry flour remain when you add the wet ingredients later.
Cut the 1 cup unsalted butter into small cubes and let it soften slightly at room temperature for about 10 minutes. Add the butter to the dry ingredients and use a pastry cutter or your fingers to work it into the flour mixture until the texture resembles coarse crumbs with pea-sized butter pieces remaining.
In a separate bowl, beat the 2 whole large eggs until lightly frothy, then mix in the 1 tablespoon vanilla extract. Gradually add this egg mixture to the flour-butter mixture while stirring with a wooden spoon. Once combined, press the dough together into a cohesive mass—it should hold its shape when pressed but still be slightly crumbly.
Shape and Bake the Cookie Cake Layers
Divide the dough into three equal portions (about 1 cup each) and flatten each portion into a 4-inch round on a sheet of parchment paper. Use the heart-shaped cookie cutter to cut out three identical heart shapes—press firmly but don't force it, as this can cause the dough to tear.
Preheat your oven to 350°F. Place each heart-shaped dough piece onto separate sheets of parchment paper on baking sheets, spacing them about 1 inch apart. Bake for 10-12 minutes until the edges are lightly golden and the centers still look slightly soft to the touch—they'll firm up as they cool.
Let the baked hearts cool completely on a wire rack before handling. This prevents them from cracking when you stack them later. The centers should be soft but not crumbly, with a subtle vanilla aroma still present.
Prepare the Buttercream Frosting
In a medium bowl, beat the 1 cup cold heavy whipping cream with an electric mixer until soft peaks form. Gradually add the 2 cups powdered sugar, mixing on low speed until combined. Increase the speed to medium-high and beat for 2-3 minutes until the frosting is smooth, fluffy, and holds stiff peaks.
If using, divide the frosting into two portions. Add the 0.5 teaspoon food coloring to one portion and mix well. For a marbled effect, gently swirl the colored and plain frosting together using a spatula. This creates visual interest while maintaining the cake's structural integrity.
Assemble and Decorate the Cake
Place one cooled heart-shaped cookie layer on a cake stand or small plate. Spread about 1/3 of the frosting evenly over the top, leaving a 1/4-inch border. Repeat with the second layer, then the third. Press down gently to create a smooth surface—this prevents the layers from shifting during decoration.
Spread the remaining frosting over the entire cake, creating a smooth, even surface. Use a small offset spatula to smooth the sides and create clean edges. For decoration, sprinkle the 0.25 cup decorative sprinkles evenly over the top while the frosting is still soft enough to adhere.
Chill the cake in the refrigerator for at least 30 minutes before serving. This allows the frosting to set properly and prevents it from melting in warm temperatures. The final result should be a perfectly structured cake with clean edges and a professional-looking finish.
Pro Tips For Making Heart Shaped Cookie Cake
- CREAM THE BUTTER SLOW: I learned this the hard way—cranking the mixer on high for butter and sugar just traps air and makes the dough tough. Instead, start on medium-low, let the butter soften naturally, and gradually increase speed as it turns pale. You’ll get that light, fluffy texture without overworking the gluten.
- CHILL THE DOUGH LONGER: I used to skip this, thinking I’d rush ahead. Big mistake. Heart-shaped cookies need that extra firmness to hold shape when baked. Wrap the dough in plastic and refrigerate for at least 2 hours—or overnight if you’re impatient like me. It’s the only way to avoid sad, flat cookies.
- WEIGH THE FLOUR: Scooping flour from the bag adds too much air, and that’s how you end up with dense, dry cookies. Use a kitchen scale for precision—aim for 240 grams (about 2 cups packed lightly). Trust me, this small step makes all the difference in texture.
- BAKE ONE SHEET AT A TIME: Crowding the tray leads to uneven baking, and heart shapes need room to spread just enough. Leave at least 2 inches between cookies, and rotate the pan halfway through. Yes, it means more batches, but your cookies will be perfectly golden, not pale centers with burnt edges.
Dietary considerations for this recipe
Gluten-Free Adaptation
Replace the 3 cups all-purpose flour with 3 cups gluten-free 1:1 baking flour like King Arthur Measure for Measure or Bob’s Red Mill. Add 1 teaspoon xanthan gum to ensure the dough binds properly—this prevents crumbling during assembly.
Chill the dough for 30 minutes before cutting to reduce stickiness. The texture will be slightly denser but still sturdy enough to hold frosting. 🌾
Dairy-Free Options
Swap the 1 cup unsalted butter for 1 cup dairy-free butter like Miyoko’s or Earth Balance. Use 1 cup cold heavy whipping cream replaced with 1 cup coconut cream (chilled overnight) for the buttercream.
For the frosting, substitute powdered sugar with confectioners’ sugar (ensure it’s dairy-free) and add 1 teaspoon lemon juice to stabilize the whipped coconut cream. The flavor stays rich, but the texture may be slightly lighter.
Nut-Free Considerations
This recipe is naturally nut-free, but always double-check ingredient labels for cross-contamination warnings. If using vanilla extract, confirm it’s processed in a nut-free facility. For added flavor, use 1 teaspoon almond-free vanilla bean paste (like Frontier Co-op) instead of extract.
Store all ingredients in airtight containers to prevent accidental mixing with nut-containing items.
Lower Sugar Version
Reduce the 0.75 cup granulated sugar in the dough to 0.5 cup and replace the remaining 0.25 cup with monk fruit sweetener (like Lakanto). For the frosting, use 1.5 cups powdered sugar and add 1 tablespoon honey or maple syrup to maintain moisture.
The cake will still hold its shape but with a subtly sweeter, less cloying taste. Pair with fresh berries for natural sweetness contrast. 🍯
Egg-Free Substitutes
Replace the 2 large eggs with 2 tablespoons ground flaxseed mixed with 6 tablespoons warm water (let sit for 5 minutes to gel). For the buttercream, use 1 cup dairy-free whipped topping (like Reddi-wip Soy Free) instead of heavy cream.
The frosting will be slightly less stable, so chill the cake for 1 hour before decorating to set properly. The texture remains sturdy enough for stacking.
Allergen-Friendly Assembly
Use separate utensils and clean surfaces when handling allergens like nuts or dairy. If baking for multiple dietary needs, assemble the cake in three individual layers (one per dietary variation) to avoid cross-contact.
Label each cake clearly. For a shared event, consider making a separate gluten-free and dairy-free version side by side—this ensures everyone can enjoy safely without compromise.
Nutrition facts
Frequently asked questions
Can I make this heart-shaped cookie cake without a heart cutter?
Use a round cutter first, then carefully trim the edges with a sharp knife to create a heart shape. For a rustic look, stack three round cookies and frost them—just add heart-shaped sprinkles or piped frosting decorations on top. A butter knife works too if you're patient and cut slowly.
Why did my cookie cake layers crack when frosting?
This usually happens when the cookies cool too quickly or aren't fully set before assembly. Let baked cookies cool completely on a wire rack, then chill them in the fridge for 10 minutes before stacking. Also ensure your frosting isn't too warm—chill it for 15 minutes before using. The layers should press together gently, not forcefully.
How far ahead can I prepare the dough?
You can make the dough up to 48 hours ahead and store it in an airtight container in the fridge. For best results, let it sit at room temperature for 30 minutes before rolling and cutting. The dough actually improves as it rests, becoming more flavorful and easier to handle. Freezing isn't recommended as it can make the texture too dry.
Can I make this recipe with store-bought cookies?
Yes, but the texture won't be as sturdy. Choose thick, sturdy cookies like Oreo or homemade shortbread (baked longer for firmness). For a 4-inch cake, use about 12-15 cookies total. Arrange them in three layers with frosting between each, pressing gently to create a stable base. The flavor will differ, but it's a great shortcut!
What's the best way to store leftovers?
Keep the cake in an airtight container at room temperature for up to 2 days. For longer storage, refrigerate for 5 days or freeze (unfrosted) for 1 month. To serve, let it sit at room temperature for 10 minutes to soften the frosting slightly. Reheat individual slices in the microwave for 5-10 seconds if needed.